Chapter Four

Do It Hydroponically

      If you’ve ever grown a backyard tomato, or kept a coleus alive through the winter, you have all the expertise you need to grow plants hydroponically. Quite simply, hydroponics is the method of cultivating plants without using soil. The plants are grown in a non-nutritive medium such as gravel or sand, or in lightweight, man-made materials such as perlite, vermiculite (a mineral-mica nutrient base), or Styrofoam. Nutrients are then supplied to the plants in one of two ways: either by soluble fertilizers that are dissolved in water, or by time-release fertilizers that are mixed into the medium.
      The advantages of a hydroponics system over conventional horticultural methods are numerous and varied. Dry spots and root drowning do not occur. Nutrient and pH problems are largely eliminated, since the grower maintains a tight control over their concentration. There is little chance of “lockup,” which occurs when nutrients are fixed in the soil and unavailable to the plant. Plants can be grown more conveniently in smaller containers. And, because there is no messing about with soil, the whole operation is easier, cleaner, and much less bothersome than it would be with conventional growing techniques.

The wick system: A plastic container with 4½" nylon wicks. The container is sitting on two bricks in a plastic oil pan. The reservoir system: A plastic container sitting in an oil pan which is kept filled with water. The bottom half of this container is filled with lava and the top half with vermiculite.
The flood system: A simple flood system in drained position. The flood system, con’t: Container being flooded manually. This unit could easily be used as a component in a larger, automatic system by attaching the tube to a pipe leading to a central reservoir and pump.

The drip emitter system: The drainage tube can lead back to a central reservoir or the water can be recirculated using a small aquarium pump. The aerated waler system: A plastic column allows air to flow freely upward. The water circulates and picks up oxygen from the air at the surface and from the bubbles.

      Most hydroponic systems fall into one of two broad categories: passive and active. Passive systems, such as reservoir or wick setups, depend on the molecular action inherent in the wick or in the medium to make water available to the plant. Active systems, which include the flood, recirculating drip, and aerated water systems, use a pump to send nourishment to the plant.
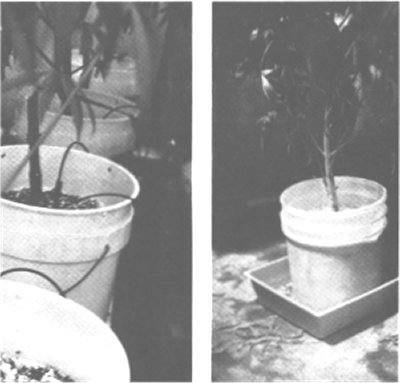
      Most commercially made “hobby” hydroponic systems designed for general use are built shallow and wide, so that an intensive garden with a variety of plants can be grown. However, most marijuana growers prefer to grow each plant in an individual container. Indoors, a three-gallon container is adequate. Outdoors, a five-gallon (or larger) container should be used if the water cannot be replenished frequently. Automatic systems irrigated on a regular schedule can use smaller containers, but all containers should be deep, rather than shallow, so that the roots can firmly anchor the plant.

PASSIVE HYDROPONIC SYSTEMS

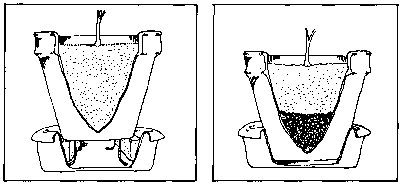
      The wick system is inexpensive and easy to set up and maintain. The principle underlying this type of passive system is that a length of 3/8 to 5/8 inch thick braided nylon rope, used as a wick, will draw enough nourishment from a reservoir filled with a water/nutrient solution to keep a growing medium moist. The container, which holds a rooting medium, has wicks running along the bottom and dropping through small, tight-fitting holes to the reservoir. Keeping the holes small makes it difficult for roots to penetrate to the reservoir. By increasing the number or length of the wicks, or their thickness, you can increase the amount of water delivered to the medium. A three-gallon container should have two wicks; a five-gallon container, three wicks. The wick system is self-regulating: the amount of water delivered depends on the amount lost through evaporation or transpiration.
      Each medium has a maximum saturation level. Beyond that point, an increase in the number of wicks will not increase the level of moisture. A 1—1—1 combination of vermiculite, perlite, and Styrofoam makes a convenient medium, because the components are lightweight and readily available. Vermiculite alone sometimes develops too air-free an environment and becomes compacted, so that a tall plant might tip over. Perlite, which doesn’t compress, keeps the medium loose and airy. Styrofoam beads hold no water, and therefore help keep the medium drier. Pea-sized chopped polyurethane foam, gravel, sand, and lava can also be used to make a medium. In any case, the bottom inch of the container should be filled only with vermiculite, which is very absorbent, so that the wicks have a good medium for moisture transfer.
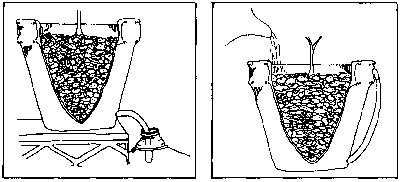
      A wick system can be constructed as follows: Cut four holes, about ½”in diameter, in the bottom of a three-gallon container. Run the wicks through the holes so that each end extends about three inches outside the container. Unbraid the wicks to aid absorption. Put two bricks in the bottom of a deep tray (an oil drip pan will do fine), into which you’ve poured the water/nutrient solution, then place the container on the bricks so that the wicks are immersed in the solution. Keep replacing the solution as it is absorbed.
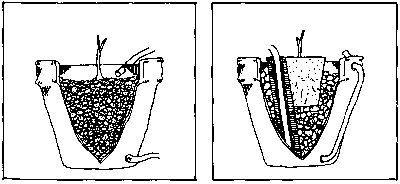
      A variation on this system can be constructed by using an additional outer container rather than a tray. With this method, less water is lost through evaporation. To make sure that the containers fit together and come apart easily, place the bricks in the bottom of the outer container. Fill the outer container with the water/nutrient solution until it comes to just below the bottom of the inner container.
      The reservoir system is even simpler than the wick system. For this setup you need only fill the bottom two or three inches of a 12-inch-deep container with a coarse, porous, inert medium such as lava, ceramic beads, or chopped pottery, and then pour in the nutrient/water solution. Variations on this method include a plastic flower pot or plastic growing bag sitting directly in a tray or pail of the nutrient/water solution.


For watering convenience, a kiddie-pool was used as a reservoir for this indoor garden.

      All passive systems should be watered from the top down, so that any surface buildup of nutrients caused by evaporation will be washed back to the bottom.

ACTIVE HYDROPONIC SYSTEMS

      The flood system consists of a tub or container holding a medium that is completely flooded on a regular basis, usually once, twice, or three times daily, depending on the growth stage and environmental factors. The medium holds enough moisture between irrigations to meet the needs of the plant. First-generation commercial greenhouses using this method were usually built with long beds of gravel that were systematically flooded. Today, the flood system is most often used with individual containers, with each container attached to the reservoir by tubing or by a leak-proof seal.
      With this system, growers have a choice of mediums, including sand, pebbles, chopped-up rubber tires, pea-sized lava, gravel, and vermiculite-perlite-Styrofoam mixtures. A recommended mixture for this setup would be one part each of perlite and Styrofoam and two parts vermiculite, or one part vermiculite and four parts lava. (Note: Because perlite and Styrofoam are lighter than water and will float if this system is fully flooded, neither should be used alone as a medium in this type of system.)
      A simple flood system can be constructed using a container with a tube attached to its bottom and a one-gallon jug. Fill the container with the medium. Each day pour the water/nutrient solution from the jug into the container, holding the tube up high enough that no water drains out. Then let tube down so that the water drains back into the jug. Some water will have been absorbed by the medium, so fill the jug to its original level before the next watering. The plants’ water needs increase during the lighted part of the daily cycle, so the best time to water is when the light cycle begins. If the medium does not hold enough between waterings, water more frequently. Flood systems can be automated by using an air pump to push water from the reservoir into the growing unit.
      Drip emitters are complete systems that can be bought in nurseries or garden shops. They have been used for years to water individual plants in gardens and homes. They can also be used with a central reservoir and a pump so that the water/nutrient solution will be redistributed periodically. If you choose this system, make sure you buy self-cleaning emitters so that the dissolved nutrients do not clog with salt deposits. Start pumping about a gallon every six hours during the daylight hours. Drip emitters can be used with semiporous mediums such as ceramic beads, lava, gravel, sand, or perlite-vermiculite-Styrofoam mixtures.

The drip method, using a vermiculite, perlite, sand mix with nutrient solution in the water is easily set up with materials available at garden supply stores. This individual reservoir is easy to set up and maintain. Lava is used as the medium in the 3½ gallon container placed on a 3 inch tray. Nutrient solution is added to the top of the tray. When the tray is empty it is refilled with plain water. Additional nutrients are added about once a month.

      The aerated water system is probably the most complex of the hydroponic systems, and because it allows the least margin for error, it should be used only by growers with previous hydroponic experience. To put together an aerated water system, you must first construct a clear air channel in your container. This is done by inserting a plastic tube cut with holes through the medium. Then a fish tank aerator is placed at the bottom of the plastic tube. The air channel allows the air to circulate without disturbing the roots, and the roots use the oxygen dissolved in the water.

Germination

      In most systems, with most mediums, seeds can be germinated in the unit, but mediums made of large pieces, such as lava or pea gravel, will not hold seeds in place. Make little beds of vermiculite in a coarser medium and plant the seeds in these beds.
      Aerated water units cannot be used to germinate seeds. Instead, start them in peat pellets or in small pots filled with vermiculite or vermiculite-based mix. Transplant them when they are two weeks old. Cuttings and rooted cuttings can also be planted in hydroponic units.

Nutrients

      Choose a fertilizer designed for hydroponic growing. Make sure that it supplies adequate amounts of nitrogen during early growth stages. Typical hydroponic fertilizers have nutrient ratios of 9-5-10 or 18-6-16 (nitrogen-phosphorus-potassium, or N-P-K). Fertilizers used for later growth should have lower ratios of N. In addition to N-P-K, the fertilizer should supply secondary and micro-nutrients, which will be listed on the label of the fertilizer package. Some fertilizers seem to be deficient in magnesium (correct this by using Epsom salts) and iron-zinc-manganese (available in combination at large nurseries).
      The pH level can also affect solubility of nutrients, so try to keep the pH of the water between 6.3 and 6.8. (The easiest way to gauge your pH level is by using pH paper. You can pick some up at any garden shop.) Before mixing the nutrients into the water, adjust the pH using sulfuric, nitric, or citric acid if it is too high; lime or baking soda if it is too low.
      Whatever system you decide to use, once the nutrient/water solution has been added, replacement water should be nutrient-free. If you notice a slowing of growth, or a nutrient deficiency, adjust the nutrient solution. For instance, if the plants show signs of a potassium deficiency (necrotic leaf tips and edges, yellowing of leaves), add potassium. Once the nutrient problem has been corrected, the plant will respond quickly and the improvement should be apparent within a few days.
      About every month or two, replace the water/nutrient solution. The discarded water makes a good garden fertilizer. Every other time you change the water, rinse the medium with clear water to wash away any salts that have been left before adding new nutrient/water solution.

How to Make a Universal Hydroponic Unit

      It is easy to make a unit that can be used for all the systems described in this chapter. Take a two-to five-gallon plastic container and cut a hole near the bottom large enough to snugly hold a plastic tube with a minimum inside diameter of 3/8“. Cut the tube three inches taller than the pot. Push 1½” of the tube through the hole from the outside and affix the end to the inside bottom using a silicone or other type of glue, or PVC tape. Caulk the seal with plastic glue or caulk.
      Making a tight, leak-proof seal can be difficult if the plastics are incompatible. Roughing out both surfaces sometimes helps. Another way of attaching the tube is to use a piece of threaded plastic pipe, two washers and two nuts. Tighten the two nuts on either side of the container wall.
      It is advisable to use clear plastic tubing so that you can see the water level and drainage action. If you’re using a two-container system, such as the wick or reservoir system, it is still easier to use an outer container with a tube, which facilitates draining. (Some commercial units have no drainage, which makes it difficult to change the nutrient/water solution.)


Plastic bags are convenient containers, but care should be taken not to disturb the roots when moving them.


Table of Contents             Next Chapter